原文地址:https://lala.im/6434.html,請支持原作者!該處僅作轉載。
首先要准备一个域名并接入到CloudFlare。这些步骤就不多BB了,省略。。。
开始我们可以先只使用CloudFlare的DNS,不开启CDN功能,即CF界面的那个云朵的图标改成灰色,显示DNS only即可。
这样做的用意是:
1.如果一开始就套CF的CDN,速度不理想,特别是晚上的时候,看个1080P估计都够呛。
2.一般需要套CDN的时候,都是小鸡的IP被墙了再开启,这样就可以救活小鸡了,说白了就是个救急的办法,不到万不得已没有必要套CDN。
利用v2ray-plugin,我们可以实现这样一套配置:shadowsocks+websocket+tls+nginx。
以下步骤Debian9/10/Ubuntu18.04/19.04通用,首先安装需要用到的软件:
apt -y install shadowsocks-libev libsodium-dev python-certbot-nginx nginx安装v2ray-plugin:
wget https://github.com/shadowsocks/v2ray-plugin/releases/download/v1.2.0/v2ray-plugin-linux-amd64-v1.2.0.tar.gz
tar -xzvf v2ray-plugin-linux-amd64-v1.2.0.tar.gz
mv v2ray-plugin_linux_amd64 /usr/bin/v2ray-plugin
rm -rf v2ray-plugin-linux-amd64-v1.2.0.tar.gz
编辑shadowsocks-libev的配置文件:
nano /etc/shadowsocks-libev/config.json修改为:
{
    "server":["::1", "127.0.0.1"],
    "mode":"tcp_and_udp",
    "server_port":51234, # shadowsocks服务port
    "local_port":1080,
    "password":"你的SS连接密码",
    "timeout":60,
    "method":"chacha20-ietf-poly1305",
    "plugin":"v2ray-plugin", # 加载v2ray插件
    "plugin_opts":"server;path=/woweizhangzhexu1s;loglevel=none" # v2ray插件配置
}
重启shadowsocks-libev:
systemctl restart shadowsocks-libev
systemctl enable shadowsocks-libev
接着新建一个nginx站点配置文件:
nano /etc/nginx/conf.d/shadowsocks.conf只需写入下面的配置即可:
server {
    listen       80;
    server_name  web.sn0w.observer; # 换成你自己的域名

location /woweizhangzhexu1s { # v2ray插件配置的path
    proxy_pass                  http://127.0.0.1:51234; # shadowsocks服务port
    proxy_redirect              off;
    proxy_http_version          1.1;
    proxy_set_header Upgrade    $http_upgrade;
    proxy_set_header Connection "upgrade";
    proxy_set_header Host       $http_host;
    }
}
剩下的申请SSL证书/配置SSL都交给certbot帮我们自动处理:
certbot --nginx --agree-tos --no-eff-email --email [email protected]在certbot配置过程中提示我们是否要强制SSL的时候选择2:
Please choose whether or not to redirect HTTP traffic to HTTPS, removing HTTP access.
- - - - - - - - - - - - - - - - - - - - - - - - - - - - - - - - - - - - - - - -
1: No redirect - Make no further changes to the webserver configuration.
2: Redirect - Make all requests redirect to secure HTTPS access. Choose this for
new sites, or if you're confident your site works on HTTPS. You can undo this
change by editing your web server's configuration.
- - - - - - - - - - - - - - - - - - - - - - - - - - - - - - - - - - - - - - - -
Select the appropriate number [1-2] then [enter] (press 'c' to cancel): 2
服务端这边就配置好了,接下来是客户端,首先要下载v2ray-plgun的win版本,下载地址:
https://github.com/shadowsocks/v2ray-plugin/releases
文件解压到shadowsocks软件的根目录(运行目录),如图所示:

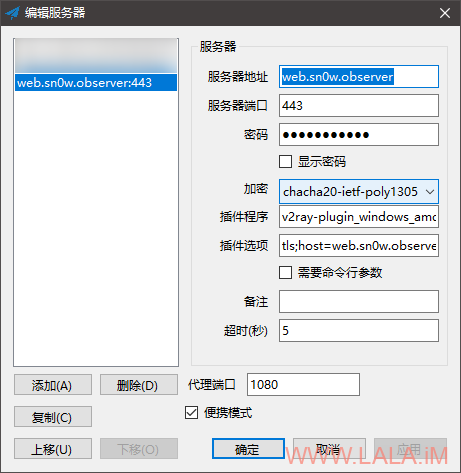
shadowsocks客户端配置如下:
服务器地址:你的域名
服务器端口:443(切记这里的端口是nginx监听的443端口)
密码:你在服务端上配置的密码
加密:你在服务端上配置的加密方式
插件程序:v2ray-plugin_windows_amd64
插件选项:tls;host=web.sn0w.observer;path=/woweizhangzhexu1s
注:host换成你自己的域名,path后面的路径对应nginx上面的配置以及服务端上的配置。
如图所示:

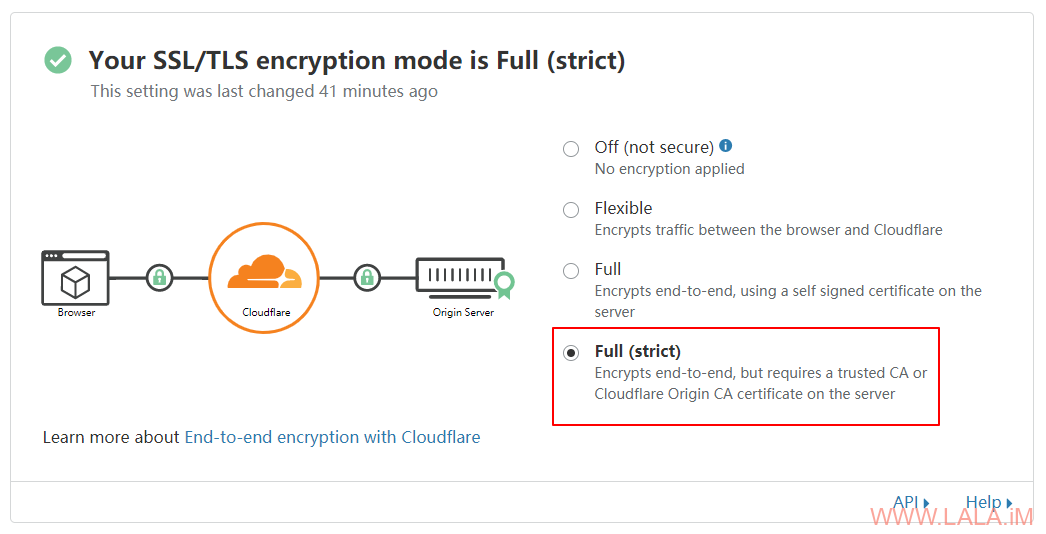
假设某一天我们小鸡的IP被墙了,此时我们只需要再多做2个步骤即可救活小鸡,首先在CloudFlare把域名接入CDN,然后在SSL/TLS界面把配置改成Full(strict)即可:

